
Cell culture protocols

 Below is a list of our most useful cell culture protocols.
Frozen cell lines
Upon receiving a shipment of frozen cells it is important that the end user gives the shipment attention without delay. The technical advice accompanying the cell lines should be consulted before removing ampoules from the dry ice. Correct handling immediately upon receipt is critical to successfully establishing the cell line in the end user’s laboratory.
At the time a cell line is ordered from ECACC, end users should also consider the culture conditions for the new cell line and make sure the appropriate medium will be available when the cells arrive.
Upon receipt, frozen ampoules should be transferred directly to gaseous phase liquid nitrogen without delay, unless they are to be used straight away. DO NOT use a -80°C freezer as an alternative; this will result in loss of viability.
For the majority of cell lines there are approximately 2- 4 x 10⁶ cells per frozen vial (1 ml per vial). Immediately post resuscitation of cell cultures it is important to perform a viable cell count to use when seeding the cells. Do not simply rely on the viable cell count figure provided. This will enable you to seed at the correct viable cell density.
Growing cell lines
Growing cultures can be provided for most cell lines and are particularly valuable for people with less experience of growing cells or for cell lines that are known to be difficult to resuscitate. They are provided in plastic flasks in transport medium that does not contain any antibiotics.
Growing cell cultures should be checked on receipt using an inverted microscope.
Check the cell density. Immediately check the cells upon arrival for any obvious defects by using an inverted microscope. Lay the flask flat in an incubator under the conditions described in the cell line data and incubate overnight. Alternatively, if the cell density is too high (more than 80% confluent) subculture the cells (harvest and reseed) immediately. Follow the guidance for adherent or suspension cells below:
|
Adherent cell lines |
|
|---|---|
|
Suspension cell lines |
|
Whether you have received frozen or growing cells, ECACC experts advise you to prepare your own frozen stock of the cell line as soon as possible after receipt. Use asceptic techniques to ensure that you do not contaminate your cells.
-
Harvest the cells in the log phase of growth. For adherent cells harvest as close to 85% confluency as possible.
-
Check whether there are any special requirements for freezing the cell line. We recommend freezing cells in a cryopreservation solution consisting of 90% serum with 10% dimethyl sulfoxide (DMSO). For some cell types DMSO may not be suitable. If DMSO is not suitable, an alternative, such as glycerol, is specified in the cell line data on the product detail pages.
-
Centrifuge the cells at 150 x g for five minutes to create a pellet. Re-suspend the pellet in the cryopreservation solution to give a final cell concentration of 3-5x10⁶ cells per ml for adherent cells and between 6-8 x10⁶ cells per ml. Pipette 1ml aliquots into the plastic vials to be used for storage (preferably internally threaded and with an O-ring though this is dependent on your inventory system).
-
Freeze the cells at a cooling rate of 1-3ºC per minute, ideally using a programmable rate-controlled freezer. When the temperature reaches at least -130ºC transfer the vials to a gas phase liquid nitrogen storage vessel. If you do not have a programmable rate controlled freezer you can use a polystyrene box or a vessel designed for slow freezing of cultures (such as a Mr Frosty) in a -80ºC freezer for a maximum of 24 hours prior to transfer to gaseous phase liquid nitrogen. Advisory note: Test cell viability by thawing one vial after short term storage in gas phase liquid nitrogen.
Advisory note: Wear personal protective equipment including laboratory coat, protective face mask and gloves when handling the frozen vials. On very rare occasions vials may explode on warming due to the expansion of trapped residual liquid nitrogen (refer to Material Safety Data Sheet on our Technical Support page)
The following guidance aims to help you establish a culture successfully and minimise cell damage and contamination:
-
Transport the vial in dry ice or in a liquid nitrogen transport vessel to maintain the vial at low temperature until you are ready to resuscitate the cells
-
Quickly transfer the vial to a 37ºC water bath*for approximately 1 to 2 minutes until no more than two ice crystals remain. Rapid thawing in this manner is essential to minimise damage to the cells; DO NOT thaw vials in an incubator or your hand *Do not totally immerse the vial in the water bath because this may cause contamination of the cells
-
Before opening it wipe the entire vial with a tissue soaked in 70% alcohol
-
Open the lid and pipette the whole content of the vial into a sterile tube (for example 15ml capacity). Then slowly add 5ml of an appropriate pre-warmed medium that has already been supplemented with the required constituents
-
Count the viable cells to ensure the correct seeding density. This can be done microscopically using a haemocytometer and trypan blue stain (the non-viable cells will be stained blue) although other methods are available.
-
Check whether the cells are adherent or suspension cells (if you are unsure check the ‘growth mode’ in the product detail pages on our website).
i) For adherent cells refer to the cell line data on our website for the recommended cell seeding density, i.e. viable cells/cm2, then calculate the amount of medium required† and flask size necessary to achieve this.
† For adherent cells the following culture medium volume ranges (minimum – maximum) are recommended for flask sizes: 25 cm2 flask 5-10ml; 75 cm2 flask 25–35ml; 175 cm2 flask 40-50ml.
Check the cell line specific data to determine whether the cells require a pre-centrifugation step; adherent cells do not normally require this. However, if the cells are to be used immediately (for example for a cell based assay) a pre-centrifugation step may be advisable to remove residual cryoprotectant. Centrifugation should be at 100-150 x g for 3-5 minutes then re-suspend the pellet in fresh medium using the appropriate volume to achieve the correct seeding density
ii) A pre-centrifugation step is recommended for suspension cells to remove cryoprotectant. Centrifuge at 100-150 x g for 3-5 minutes then re-suspend the pellet in fresh medium using the appropriate volume to achieve the correct seeding density i.e. viable cells/ml. We recommend seeding your suspension cells at a relatively high density of 5-7 x 10⁵cells/ml.
7. Incubate the cells at the temperature and CO2 level recommended on the product detail page. Use flasks with vented caps to allow gaseous exchange if you are using a CO2 incubator and if CO2 is required to grow the cells
Please note:
When recovering hybridoma cultures from frozen it is not unusual for growth initially to be slower than expected and there may be an observed decrease in viability. Establishment of an actively proliferating culture may take up to 2 weeks. Following resuscitation, seed at 4-5x10⁵ cells/ml. Observe after 24 hours and monitor daily until the cell density has reached 8-9x10⁵ cells/ml before subculturing. Centrifuge at 100–150 x g for 3-5 minutes then re-suspend the cells in fresh medium rather than diluting them.
Often hybridoma cultures can benefit from being re-suspended with media supplemented with 20% foetal bovine serum (FBS) in the early critical stage of culture establishment immediately post resuscitation.
One of the most common reasons for the failure to establish cells in culture is due to using an incorrect viable cell seeding density at the time of resuscitation i.e. seeding cells too low or too high. This can be avoided by performing a viable cell count and following the recommended seeding density.
Equipment and reagents
- Haemocytometer plus a supply of cover-slips
- 0.4% Trypan Blue stain (fresh & filtered) in phosphate buffered saline
- Tally Counter
- Cell Suspension
- Gilson pipettes or similar
- Inverted microscope (preferably phase contrast)
Procedure
1. Ensure the cover-slip and haemocytometer are clean and grease-free (use alcohol to clean).
2. Moisten (with water or exhaled breath) and affix cover-slip to the haemocytometer.
3. Look for "Newton's Rings" which indicate that the cover slip has adhered via suction to the haemocytometer. Newton's refraction rings are seen as rainbow-like rings under the cover-slip.
4. Mix equal volumes of 0.4% trypan blue stain and a well mixed cell suspension (not too vigorous) e.g. mix 100µl trypan blue stain with 100 µl cell suspension.
5. Pipette trypan blue/cell mix (approximately 10µl) at the edge of the cover-slip and allow to run under the cover slip.
6. Visualise the haemocytometer grid under the microscope, refer to figure 1 for layout of grid. Please note:
i. Trypan Blue is a "vital stain"; it is excluded from live cells.
ii. Live cells appear colourless and bright (refractile) under phase contrast.
iii. Dead cells stain blue and are non-refractile.
iv. To aid accuracy and consistency of cell counts use counting system illustrated in figure 2.
7. Count viable (live) and dead cells in one or more large corner squares and record cell counts.
8. It is advisable to count around 40 to 70 cells to obtain an accurate cell count - therefore it may be necessary to count more than one large corner square.
9. To calculate cell concentration per ml:
Average number of cells in one large square x dilution factor* x 104
*dilution factor is usually 2 (1:1 dilution with trypan blue), but may need to further dilute (or concentrate) cell suspensions.
104 = conversion factor to convert 10-4ml to 1ml (refer to figure 3 to view a diagram of the arrangement and dimensions)
Calculation of Cell Viability:
No. of Viable Cells Counted / Total Cells Counted (viable and dead) x 100 = % viable cells
Click here for our cell counting calculator
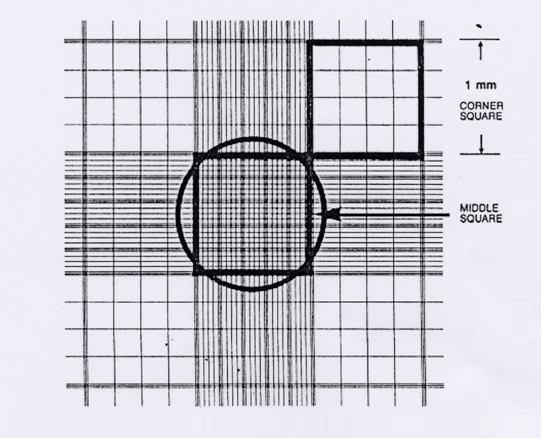
Figure 1. Appearance of the haemocytometer grid visualised under the microscope
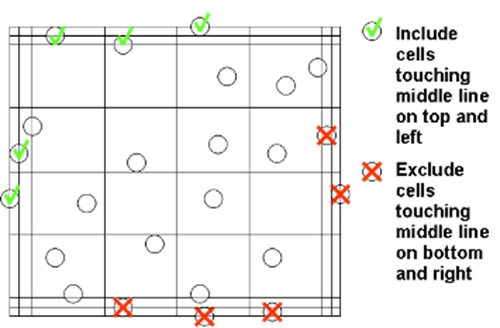
Figure 2. Counting system to ensure accuracy and consistency. Count the cells within the large square and those crossing the edge on two out of the four sides
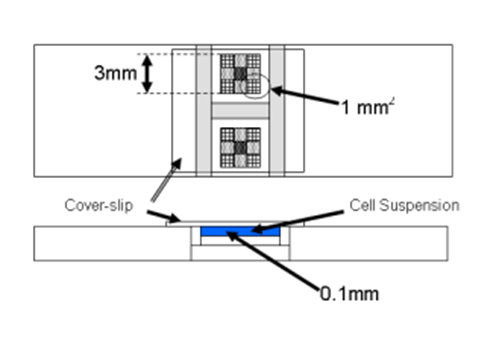

Figure 3. Haemocytometer arrangement and dimensions
 Aim
Aim
Adherent cell lines will grow in vitro until they have covered the surface area available or the medium is depleted of nutrients. At this point the cell lines should be subcultured in order to prevent necrosis or apoptosis. To subculture the cells they need to be brought into suspension. The degree of adhesion varies from cell line to cell line but in the majority of cases proteases e.g. trypsin, are used to release the cells from the flask. However, this may not be appropriate for some lines where exposure to proteases is harmful or where the enzymes used remove membrane markers/receptors of interest. In these cases cells should be brought into suspension into a small volume of medium mechanically with the aid of cell scrapers.
Materials
-
media pre-warmed to 37°C (refer to the ECACC Cell Line Data Sheet for the correct medium)
-
70% (v/v) isopropanol in sterile water
-
PBS without Ca2+/Mg2+
-
25% trypsin/EDTA in HBSS, without Ca2+/Mg2+
-
soybean trypsin inhibitor
-
Trypan blue (vital stain)
Equipment
-
personal protective equipment (sterile gloves, laboratory coat, safety visor)
-
waterbath set to appropriate temperature
-
microbiological safety cabinet at appropriate containment level
-
incubator
-
pre-labelled flasks
-
inverted phase contrast microscope
-
centrifuge
-
haemocytometer
-
marker pen
-
pipettes
-
ampoule rack
-
tissue
Procedure
-
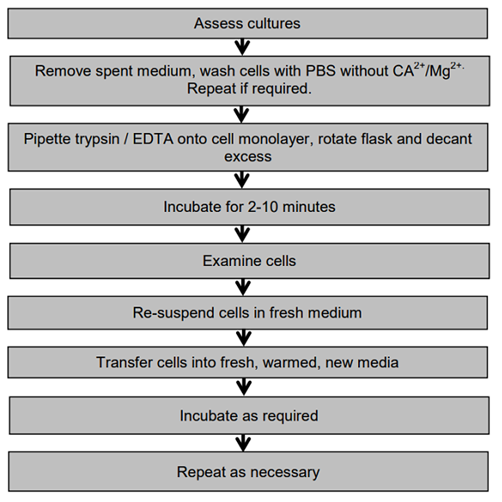
View cultures using an inverted microscope to assess the degree of confluency and confirm the absence of bacterial and fungal contaminants
-
Remove spent medium
-
Wash the cell monolayer with PBS without Ca2+/Mg2+ using a volume equivalent to half the volume of culture medium. Repeat this wash step if the cells are known to adhere strongly
-
Pipette trypsin/EDTA onto the washed cell monolayer using 1ml per 25cm2 of surface area. Rotate flask to cover the monolayer with trypsin. Decant the excess trypsin
-
Return flask to the incubator and leave for 2-10 minutes
-
Examine the cells using an inverted microscope to ensure that all the cells are detached and floating. The side of the flasks may be gently tapped to release any remaining attached cells
-
Transfer cells to a sterile 15 ml tube. Wash the flask with an equal volume of serum-containing media.
-
Re-suspend the cells in a small volume of fresh serum-containing medium to inactivate the trypsin remove 100-200μl and perform a cell count (see Protocol 6 - Cell Quantification, p.50). In the case of cells cultured in serum-free media, use a trypsin inhibitor e.g. soybean trypsin inhibitor to inactivate the trypsin
-
Transfer the required number of cells to a new labelled flask containing pre-warmed medium (refer to the appropriate ECACC Cell Line Data Sheet for the required seeding density)
-
Incubate as appropriate for the cell line
-
Repeat this process as demanded by the growth characteristics of the cell line.
Key points
-
Some cultures, whilst growing as attached lines, adhere only lightly to the flask, thus it is important to ensure that the culture medium is retained and the flasks are handled with care to prevent the cells detaching prematurely
-
Although most cells will detach in the presence of trypsin alone EDTA enhances the activity of the enzyme by removing inhibitory cations
-
Trypsin is inactivated in the presence of serum. Therefore, it is essential to remove all traces of serum from the culture medium by washing the monolayer of cells with PBS without Ca2+/Mg2+
-
Cells should only be exposed to trypsin/EDTA long enough to detach cells. Prolonged exposure could damage cell surface receptors
-
Trypsin should be neutralised with serum prior to seeding cells into new flasks otherwise cells will not attach
-
Trypsin may also be neutralised by the addition of soyabean trypsin inhibitor, where an equal volume of inhibitor at a concentration of 1mg/ml is added to the trypsinised cells. The cells are then centrifuged, re-suspended in fresh culture medium and counted as above. This is especially necessary for serum-free cell cultures
-
If a CO2 incubator is not available gas the flasks for 1-2min with 5% CO2 in 95% air filtered through a 0.2μm filter
-
If the cells harvested are at too low a cell density to re-seed at the appropriate cell density into fresh flasks it may be necessary to centrifuge the cells e.g. 5 mins at 150 x g, and re-suspend in a smaller volume of medium.
Please note: For subculture of serum free / AC-free adherent cell lines please refer to the information contained in the cell line catalogue entry.
Aim
Some cultures grow as a mixed population (e.g. B95-8 - marmoset) where a proportion of cells do not attach to the tissue culture flask and remain in suspension. Other cell lines such as RAW 264.7 loosely attach to the plastic. Therefore to maintain this heterogeneity both the attached cells and the cells in suspension must be sub-cultured.
Materials
-
media pre-warmed to 37°C (refer to the ECACC Cell Line Data Sheet for the correct medium)
-
70% (v/v) isopropanol in sterile water
-
PBS without Ca2+/Mg2+
-
25% trypsin/EDTA in HBSS, without Ca2+/Mg2+
-
soybean trypsin inhibitor
-
Trypan blue (vital stain)
-
cell scrapers
Equipment
-
personal protective equipment (sterile gloves, laboratory coat, safety visor if required)
-
waterbath set to appropriate temperature
-
microbiological safety cabinet at the appropriate containment level
-
centrifuge
-
inverted phase contrast microscope
-
incubator
-
haemocytometer
-
pre-labelled flasks
-
marker pen
-
pipettes
Procedure
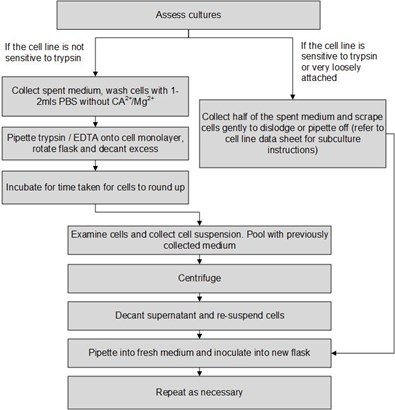
If the cells are not sensitive to trypsin:
-
View cultures using an inverted phase contrast microscope to assess the degree of confluency and confirm the absence of bacterial and fungal contaminants. Give the flask a gentle knock first, this may dislodge the cells from the flask and remove the need for a trypsinisation step loss of some cells due to associated washes
-
Decant medium containing non-adherent cells into a sterile centrifuge tube and retain
-
Wash any remaining attached cells with PBS without Ca2+/Mg2+ using 1-2ml for each 25cm2 of surface area. Retain the washings
-
Pipette trypsin/EDTA onto the washed cell monolayer using 1ml per 25cm2 of surface area. Rotate flask to cover the monolayer with trypsin. Decant the excess trypsin
-
Return flask to incubator and leave for 2-10 minutes
-
Examine the cells using an inverted microscope to ensure that all the cells are detached and floating. The side of the flasks may be gently tapped to release any remaining attached cells (see Protocol 6 - Cell Quantification)
-
Transfer the cells into the centrifuge tube containing the retained spent medium and cells and perform a cell count
-
Centrifuge the entire cell suspension at 150 x g for 5 minutes
-
Remove the supernatant and re-suspend the cell pellet in a small volume (10-20ml) of fresh culture medium. Count the cells
-
Pipette the required number of cells into a new labelled flask and dilute to the required volume using fresh medium (refer to ECACC Cell Line Data Sheet for the required seeding density)
-
Repeat this process every 2-3 days as necessary
If the cells are sensitive to trypsin or are loosely attached:
-
View cultures using an inverted phase contrast microscope to assess the degree of confluency and confirm the absence of bacterial and fungal contaminants. Give the flask a gentle knock first, this may dislodge the cells from the flask and remove the need for a trypsinisation step loss of some cells due to associated washes
-
Decant half the medium containing non-adherent cells into a sterile centrifuge tube and retain
-
Harvest the cells according to the cell line data sheet i.e. scraping or pipetting
-
Examine the cells using an inverted microscope to ensure that all the cells are detached and floating.
-
Transfer the cells into the centrifuge tube containing the retained spent medium and perform a cell count
-
Pipette the required number of cells into a new labelled flask and dilute to the required volume using fresh medium (refer to ECACC Cell Line Data Sheet for the required seeding density)
-
Repeat this process every 2-3 days as necessary.
Key Points
-
Although most cells will detach in the presence of trypsin alone the inclusion of EDTA enhances the activity of the enzyme by removing inhibitory cations
-
Trypsin is inactivated in the presence of serum. Therefore, it is essential to remove all traces of serum from the culture medium by washing the monolayer of cells with PBS without Ca2+/Mg2+. Repeated warming to 37°C also inactivates trypsin
-
Cells should only be exposed to trypsin/EDTA long enough to detach cells. Prolonged exposure could damage cell surface receptors. In general, a shorter time of exposure to trypsin is required for semi-adherent cell lines in comparison to adherent cell lines
-
Trypsin should be neutralised with serum prior to seeding cells into new flasks otherwise cells will not attach
-
Trypsin may also be neutralised by the addition of Soybean Trypsin Inhibitor, where an equal volume of inhibitor at a concentration of 1mg/ml is added to the trypsinised cells. The cells are then centrifuged, re-suspended in fresh culture medium and counted as above
-
If a CO2 incubator is not available gas the flasks for 1-2 minutes with 5% CO2 in 95% air filtered through a 0.2μm filter.
 Aim
Aim
In general terms cultures derived from blood (e.g. lymphocytes) grow in suspension. Cells may grow as single cells or in clumps (e.g. EBV transformed lymphoblastoid cell lines). For these types of cell lines subculture by dilution is relatively easy. However, for cell lines that grow in clumps it may be necessary to bring the cells into a single cell suspension by centrifugation and resuspension by pipetting in a smaller volume before counting.
Materials
-
media – pre-warmed to 37°C (refer to the ECACC Cell Line Data Sheet for the correct medium)
-
70% (v/v) isopropanol in sterile water
-
Trypan blue (vital stain)
Equipment
-
personal protective equipment (sterile gloves, laboratory coat, safety visor)
-
water bath set to 37°C
-
microbiological safety cabinet at appropriate containment level
-
centrifuge
-
incubator
-
inverted phase contrast microscope
-
haemocytometer
-
pre-labelled flasks
-
marker pen
-
pipettes
Procedure
-
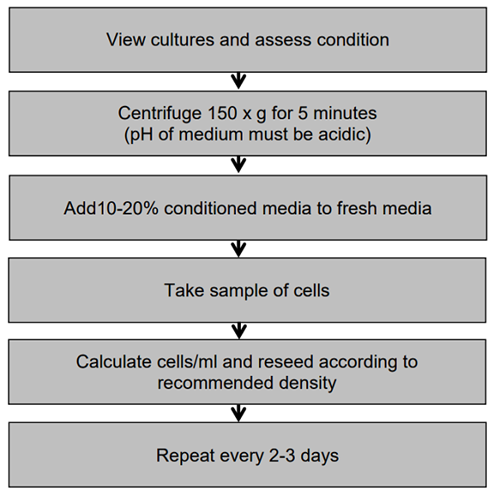
View cultures using an inverted phase contrast microscope. Cells growing in exponential growth phase should be bright, round and refractile. Hybridomas may be very sticky and require a gentle knock to the flask to detach the cells. Alternatively you can use ultra-low attachment flasks which allow the cells to grow in suspension. EBV transformed cells can grow in very large clumps that are very difficult to count and the centre of the large clumps may be non-viable
-
Do not centrifuge to subculture unless the pH of the medium is acidic (phenol red = yellow) which indicates the cells have overgrown and may not recover. If this is so, centrifuge at 150 x g for 5 minutes, re-seed at a slightly higher cell density and add 10-20% of conditioned medium (supernatant) to the fresh media
-
Take a small sample (100-200μl) of the cells from the cell suspension and count the cells (Protocol 6 - Cell Quantification). Calculate cells/ml and re-seed the desired number of cells into freshly prepared flasks, without centrifugation, just by diluting the cells. Refer to the data sheet supplied with the cell line for the recommended seeding density
-
Repeat this every 2-3 days.
Key point
If the cell line is a hybridoma or another cell line that produces a substance (e.g. recombinant protein or growth factor) of interest retain the spent media for analysis.